Building an NFT Collection Holder Snapshot App with Near Social

Introduction
As the popularity of NFTs continues to grow, it becomes increasingly valuable to have a tool that can quickly fetch, display, and export NFT data from any collection on the NEAR blockchain. In this blog post, we will guide you through the process of building an NFT Collection Holder Snapshot App using Near Social.
See the app live here: https://alpha.near.org/#/9c461db4ac11b66ed1167ff969042ac278eaf2d571712585424be00171a63884/widget/NFT-Collection-Holder-Snapshot
Overview
The NFT Collection Holder Snapshot App allows users to:
- Fetch NFT data from any collection on the NEAR blockchain.
- Display the information in a table format with pagination.
- Export the data as a CSV file.
We will build this app using Near Social and the Indexer.xyz API.
Prerequisites
To build this app, you will need:
- Basic knowledge of JavaScript.
- Familiarity with the Near Social platform.
Steps to Build the App
- Set up the project and state management.
- Fetch NFT data using the Indexer.xyz API.
- Prepare holder data.
- Display the data in a table format with pagination.
- Export the data as a CSV file.
- Finalize the UI.
Step 1: Setting up the project and state management
To set up our project, we will use Near Social to create a new app. Then, we'll define our initial state, which includes variables such as slug, nftData, holdersData, currentPage, and rowsPerPage.
initState({
  slug: "asac.near",
  nftData: [],
  holdersData: [],
  currentPage: 0,
  rowsPerPage: 10,
  downloadLink,
});
Step 2: Fetching NFT data using Indexer.xyz API
In this step, we'll create a function called fetchData that will fetch NFT data from the given collection using the Indexer.xyz API. We'll make a POST request to the API, passing in the collection contract key (slug) as a query parameter.
const fetchData = () => {
  State.update({ nftData: [] });
  console.log("fetchData()");
  const { slug } = state;
  console.log(slug);

  let data = fetch("<https://byz-multi-chain-01.hasura.app/v1/graphql>", {
    method: "POST",
    headers: {
      "x-api-key": "ChRbeKE.c94220449dbb45973a67a614b1f590be",
      "Content-Type": "application/json",
      "Hasura-Client-Name": "near-social",
    },
    body: JSON.stringify({
      query: `
      query MyQuery {
  near {
    collection(where: {slug: {_eq: "${state.slug}"}}) {
      slug
      nft_metas (order_by: {token_id: asc}) {
        token_id
        nft_state {
          owner
          staked_owner
        }
      }
    }
  }
}
`,
    }),
  });
  if (data) {
    const nftData = data.body.data.near.collection[0].nft_metas;
    console.log("here ---->>>>", nftData);
    State.update({ nftData });
    prepareHoldersData();
  }
};
Step 3: Preparing holder data
After fetching the NFT data, we need to prepare the holder data for display. We'll create a function called prepareHoldersData that will iterate through the fetched NFT data and create an object with information about each holder, including the number of tokens they own, the number of staked tokens, and the specific tokens they hold and stake.
const prepareHoldersData = () => {
  const holders = {};

  state.nftData.forEach((token) => {
    const owner = token.nft_state.owner;
    const staked_owner = token.nft_state.staked_owner;

    if (owner) {
      if (!holders[owner]) {
        holders[owner] = { count: 0, staked: 0, tokens: [], stakedTokens: [] };
      }
      if (!staked_owner || owner !== staked_owner) {
        holders[owner].count += 1;
        holders[owner].tokens.push(token.token_id);
      }
    }

    if (staked_owner && owner !== staked_owner) {
      if (!holders[staked_owner]) {
        holders[staked_owner] = {
          count: 0,
          staked: 0,
          tokens: [],
          stakedTokens: [],
        };
      }
      holders[staked_owner].staked += 1;
      holders[staked_owner].stakedTokens.push(token.token_id);
    }
  });

  const holdersData = Object.entries(holders)
    .map(([owner, data]) => ({ owner, ...data }))
    .sort((a, b) => b.count + b.staked - (a.count + a.staked));

  State.update({ holdersData });
};
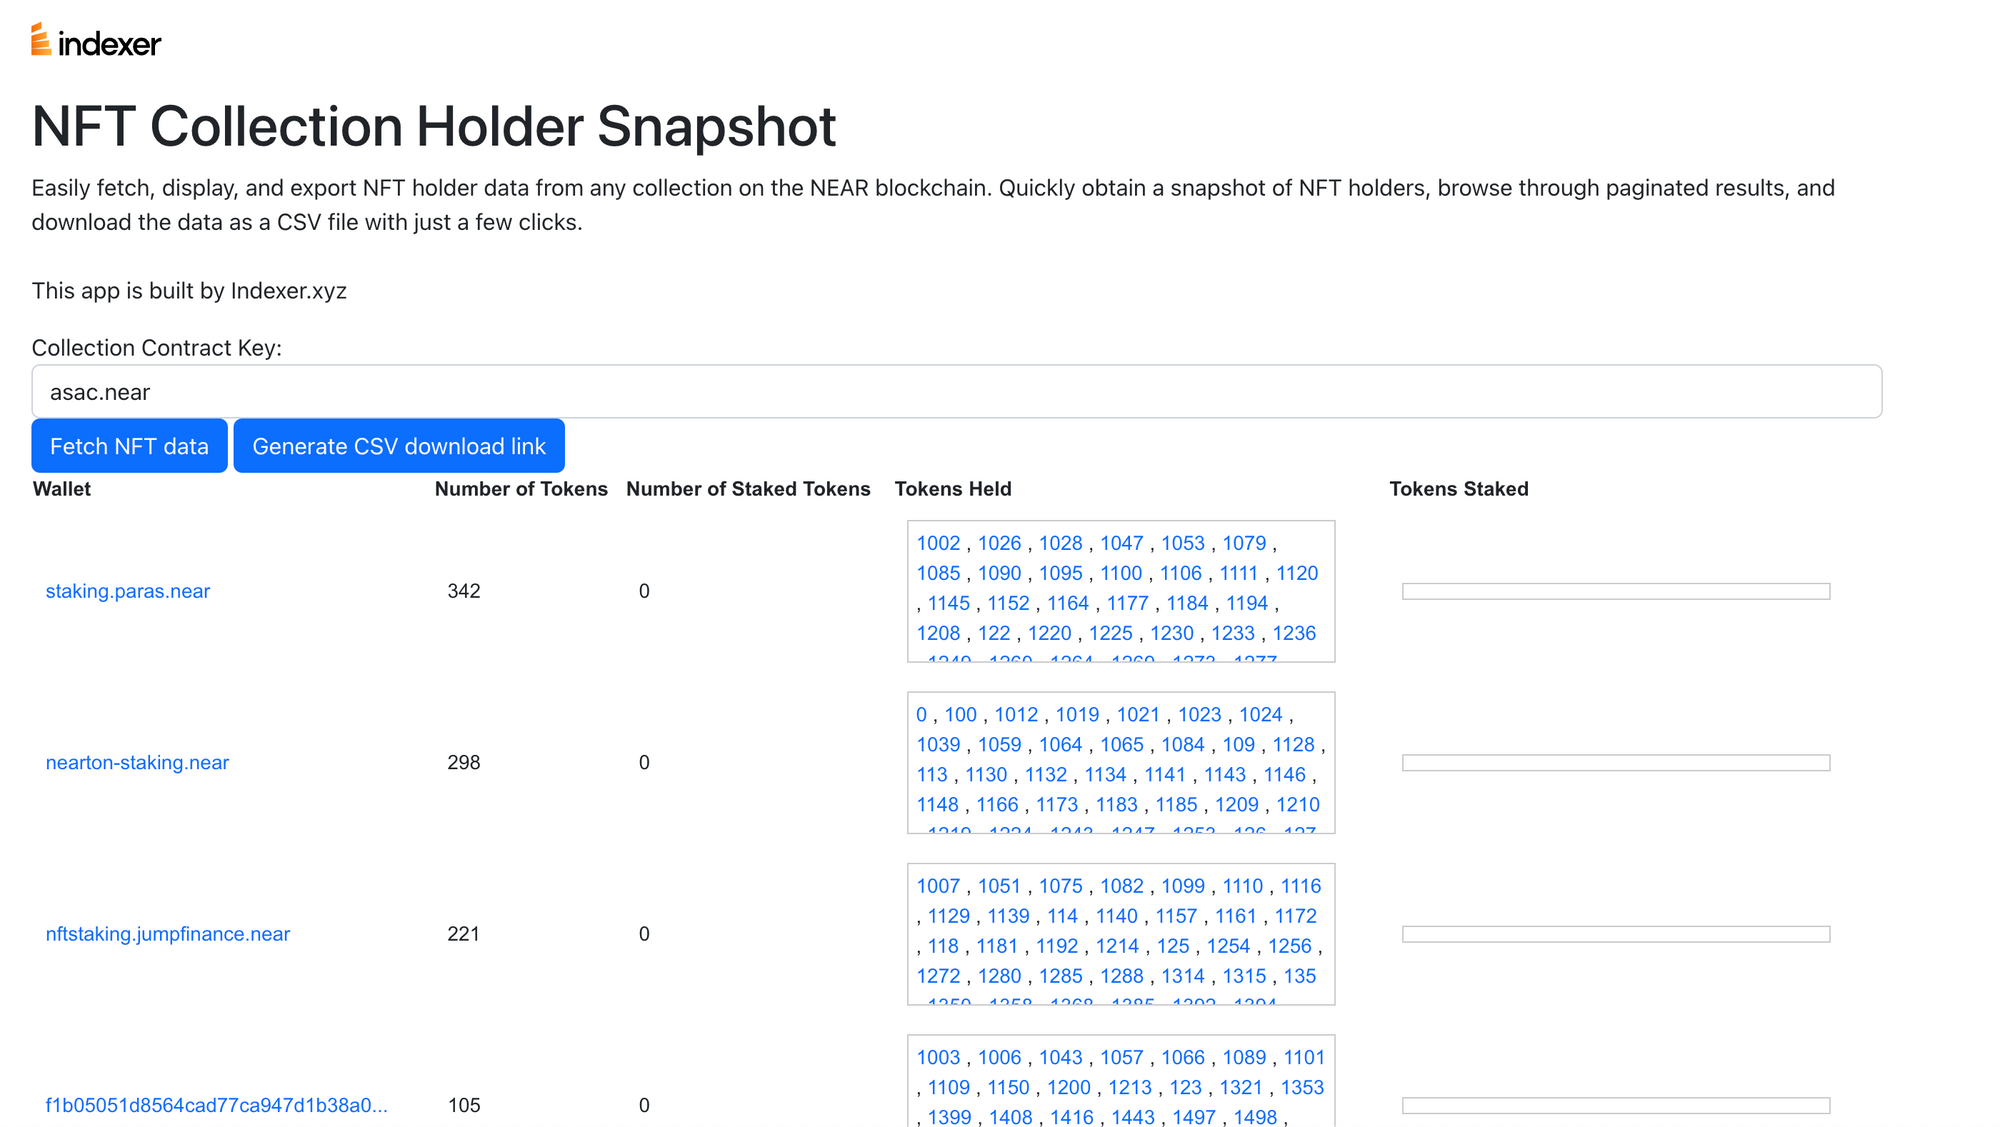
Step 4: Displaying the data in a table format with pagination
With the holder data prepared, we can now display it in a table format. We'll create a table with columns for the wallet, number of tokens, number of staked tokens, tokens held, and tokens staked. Additionally, we'll implement pagination to navigate through the data easily.
<table
  style={{
    borderCollapse: "collapse",
    width: "100%",
    fontFamily: "Arial, sans-serif",
    fontSize: "14px",
  }}
>
  <thead>
    <tr>
      <th>Wallet</th>
      <th>Number of Tokens</th>
      <th>Number of Staked Tokens</th>
      <th>Tokens Held</th>
      <th>Tokens Staked</th>
    </tr>
  </thead>
  <tbody>
    {state.holdersData
      .slice(
        state.currentPage * state.rowsPerPage,
        (state.currentPage + 1) * state.rowsPerPage
      )
      .map((holder) => (
        <tr>
          <td style={{ padding: "10px" }}>
            <a
              href={`https://www.tradeport.xyz/near/profile/${holder.owner}?tab=collected`}
              target="_blank"
              rel="noopener"
            >
              {holder.owner.length > 30
                ? holder.owner.slice(0, 30) + "..."
                : holder.owner}
            </a>
          </td>
          <td style={{ padding: "10px" }}>{holder.count}</td>
          <td style={{ padding: "10px" }}>{holder.staked}</td>
          <td style={{ padding: "10px" }}>
            <div
              style={{
                maxHeight: "100px",
                overflowY: "scroll",
                width: "300px",
                border: "1px solid #ccc",
                padding: "5px",
              }}
            >
              {holder.tokens
                .filter(
                  (tokenId) => !holder.stakedTokens.includes(tokenId)
                )
                .map((tokenId, index, filteredTokens) => (
                  <div key={tokenId} style={{ display: "inline" }}>
                    <a
                      href={`https://www.tradeport.xyz/near/collection/${state.slug}/token/${tokenId}} target="_blank" rel="noopener" > {tokenId} </a> {index < filteredTokens.length - 1 && ", "} </div> ))} </div> </td> <td style={{ padding: "10px" }}> <div style={{ maxHeight: "100px", overflowY: "scroll", width: "300px", border: "1px solid #ccc", padding: "5px", }} > {holder.stakedTokens.map((tokenId, index) => ( <div key={tokenId} style={{ display: "inline" }}> <a href={<https://www.tradeport.xyz/near/collection/${state.slug}/token/${tokenId}`>}
target="_blank"
rel="noopener"
>
{tokenId}
</a>
{index < holder.stakedTokens.length - 1 && ", "}
</div>
))}
</div>
</td>
</tr>
))}

  </tbody>
</table>
Step 5: Exporting the data as a CSV file
To export the holder data as a CSV file, we'll create a function called exportToCsv that will convert the data to a CSV format and then create a download link.
const exportToCsv = () => {
  const header = [
    "Wallet",
    "Number of Tokens",
    "Number of Staked Tokens",
    "Tokens Held",
    "Tokens Staked",
  ];
  const rows = state.holdersData.map((holder) => [
    holder.owner,
    holder.count,
    holder.staked,
    holder.tokens.filter((tokenId) => !holder.stakedTokens.includes(tokenId)),
    holder.stakedTokens,
  ]);

  const csvContent =
    "data:text/csv;charset=utf-8," +
    [header, ...rows].map((e) => e.join(",")).join("\\n");

  State.update({ downloadLink: csvContent });
};
Step 6: Finalizing the UI
With all the functionality in place, we'll now finalize the UI by adding input fields to enter the collection slug, buttons to fetch the data and export it as a CSV file, and pagination controls.
<div>
<input
type="text"
value={state.slug}
onChange={(e) => State.update({ slug: e.target.value })}
placeholder="Enter collection slug"
/>
<button onClick={fetchData}>Fetch Data</button>
<br />
<br />
<button onClick={exportToCsv}>
<a
download={`${state.slug}-holders.csv`}
href={state.downloadLink}
onClick={(e) => {
if (!state.downloadLink) e.preventDefault();
}}
>
Export to CSV
</a>
</button>
<br />
<br />
<nav>
<button
onClick={() =>
State.update({ currentPage: Math.max(0, state.currentPage - 1) })
}
>
< Previous
</button>
<span>
{" "}
Page {state.currentPage + 1} of{" "}
{Math.ceil(state.holdersData.length / state.rowsPerPage)}{" "}
</span>
<button
onClick={() =>
State.update({
currentPage: Math.min(
Math.ceil(state.holdersData.length / state.rowsPerPage) - 1,
state.currentPage + 1
),
})
}
>
Next >
</button>
</nav>
<br />
</div>
Conclusion
In this blog post, we have laid out the framework for constructing an NFT Collection Holder Snapshot App using Near Social. The app fetches NFT data from a specific collection on the NEAR blockchain, displays it in a table format with pagination, and enables its users to export the data as a CSV file. With this app, users are empowered to easily gain an overview of NFT holders and their holdings in any collection on the NEAR blockchain.
As NFTs continue their meteoric rise in popularity, tools such as the NFT Collection Holder Snapshot App become increasingly invaluable for collectors, traders, and creators alike. Furthermore, this app can be further enhanced with additional features, such as filtering or sorting the data, integrating with other APIs, or adding more visualization options.
Happy coding!